You ask your doctor which crutches to buy and they simply say, "Get what fits." That leaves you comparing mysterious specs (cuff styles, rubber tips, weight limits) while wondering which option will keep you upright on slippery floors or crowded stairs. I tried multiple setups in real-life settings so you can skip the guessing game. This guide shows the tradeoffs between underarm and forearm crutches, how to gauge fit and features, and when it is smarter to rent or buy. If you need a refresher on the fundamentals before diving in, skim the choosing crutches basics guide so the terminology below feels familiar.
The goal is to match a device to your body and routine, not settle for the first pair that is in stock. When you pair the right type with correct sizing, ergonomic handles, and fresh tips, your shoulders relax, your wrists last longer, and every errand feels less like a circus act. Brand new users can also walk through the getting started on crutches guide for safe first steps and gait basics before focusing on gear.
Key takeaways
- Underarm crutches are great for short recoveries or brand-new users, while forearm crutches shine for long-term use and tighter spaces.
- Fit beats brand. Proper height, cuff placement, and weight capacity prevent wrist pain, shoulder shrugging, and sketchy balance.
- Handles, cuffs, and tips change comfort dramatically, so test how each feels after ten minutes, not just one step.
- Rent for 4–6 week recoveries and buy if you will need crutches for months, want ergonomic upgrades, or plan to use them again.
- Inspect everything before leaving the store. Worn tips or wobbly pins are safety risks, even if the price is tempting.
Table of contents
Crutch types at a glance
You will see a few distinct crutch designs online and in medical supply stores. Knowing the tradeoffs of each type helps you advocate for what your body actually needs.
Underarm (axillary) crutches
The classic style with padded tops and straight handles. They are inexpensive, widely available, and often stocked in rental fleets.
- Pros: Easy to find, quick to adjust, familiar for clinicians teaching weight-bearing restrictions.
- Cons: Encourage shoulder shrugging if sized poorly, bulky in tight hallways, can irritate nerves if you lean on the pads.
- Best for: Short recoveries or anyone who needs a pair immediately and plans to return them once they heal.
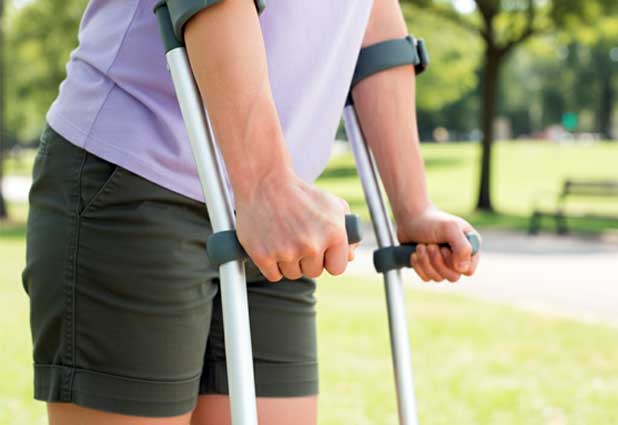
Forearm (Lofstrand) crutches
These use a cuff around your forearm plus a handle, so your upper body stays more engaged and your hands can briefly free themselves without dropping the crutch.
- Pros: Less bulk, easier on stairs, more control on uneven pavement, better long-term comfort.
- Cons: Smaller rental supply, higher cost, and a short learning curve for new users.
- Best for: Long recoveries, chronic conditions, or anyone who needs to juggle bags, doors, and phones on the move. They partner well with the carrying tricks in How to Carry Things on Crutches.
Platform and specialty crutches
Platform crutches let you rest the forearm on a padded shelf and strap in, while other specialty options (like knee crutches) offload pressure entirely.
- Pros: Protect hands and wrists for users with arthritis, overuse injuries, or joint replacements.
- Cons: Heavier, harder to maneuver, and usually need to be ordered in advance.
- Best for: Anyone cleared by their provider who cannot grip traditional handles safely.
Mobility alternatives
Crutches are not the only option. Walkers, canes, and knee scooters cover different weight-bearing rules. If hopping everywhere feels miserable, compare designs in our knee scooter guide before investing in another pair of crutches.
Quick visual
Use the illustration in What Can I Use Instead of Crutches? to compare silhouettes side by side before you shop. That visual makes it obvious when crutches are the wrong match and a scooter or walker might handle your recovery better.
How I tested different crutches
I rotated between underarm, forearm, and specialty tips over several months, taking them through real errands, stairwells, and appointments to understand how each performed day to day.
- Surfaces: Tile, hardwood, carpeted hallways, ramps, rain-soaked sidewalks, and office stairs.
- Distances: Kitchen-to-couch trips, 30-minute errands, and six-hour clinic days with frequent stops.
- Weight checks: Aluminum underarm crutches averaged 1.4 lbs each, while a carbon fiber forearm model weighed 0.9 lbs. That half pound per side mattered by hour two.
- Cuff comfort: Closed cuffs felt secure outdoors but caused hot spots after 30 minutes; open cuffs were easier inside when I needed to free a hand.
- Handles: Straight grips numbed my palms on long walks. Ergonomic handles felt odd for a day but removed pressure points entirely.
- Tip traction: Shock-absorbing tips with deep tread quietly gripped wet tile, while worn standard tips squeaked and slid on stairs.
- Adjustability: Loose-feeling push pins made the entire crutch rattle. Solid spring buttons stayed silent and much safer.
Fit and sizing basics
Fit determines whether you feel stable or exhausted after five minutes. Even premium crutches will disappoint if the height and handle placement are off.
Why fit matters more than logos
Crutches that are too tall make you hike your shoulders and tilt backward. Crutches that are too short force a hunch and overload your wrists. Correct sizing keeps your core stacked and your stride smooth.
Measurement concepts to discuss with your provider
- Underarm clearance: Pads should sit roughly 2 finger widths below your armpits with the shoes you plan to wear daily.
- Handle height: Aligns with the wrist crease so your elbow bends 15–30 degrees the moment you grip.
- Forearm cuff placement: Rests 1–2 inches below your elbow and stays snug without pinching.
- Tip position: Lands a few inches forward and to the side of your toes so the crutch makes a tripod with your legs.
Your physical therapist should double-check these measurements in person and watch you move. Ten minutes of professional adjustment can spare weeks of shoulder, wrist, or back pain.
Signs your crutches need adjustment
- Shoulders lifted toward your ears or slumping downward.
- Elbows locked straight or bent past 45 degrees while walking.
- Tips landing far outside your feet or clipping your toes.
- Numb fingers, sore underarms, or aching upper back after short trips.
If any of those show up, schedule a tune-up or ask your provider to watch your gait again.
Features and specs that matter
Once fit is dialed in, focus on the components that change daily comfort and safety.
Height range and adjustability
Most adult crutches adjust in one-inch increments. Look for sturdy buttons or pins that click cleanly without wobble. If you are under 5 feet or over 6 feet 2 inches, confirm the published range before buying.
Weight capacity
Standard aluminum crutches support 250–300 lbs, while heavy-duty steel options reach 400–500 lbs. Never guess. Check the sticker or manufacturer sheet. Underrated crutches can bend, crack, or fail on stairs.
Handles and grips
Handles are the part you feel every second. Straight foam grips work for quick errands but flatten fast. Ergonomic or angled grips spread pressure across your palm, and textured rubber prevents slipping when your hands get sweaty. For deeper strategies, see How to Prevent Hand and Wrist Pain on Crutches.
Cuffs and underarm pads
Forearm crutches typically offer open cuffs (easy exit, slightly less secure) and closed cuffs (more secure, warmer). Underarm pads should feel dense yet soft. If they are thin or cracked, budget for replacements on day one.
Tips and traction
Fresh tips grip; worn tips slip. Standard rubber tips handle dry floors, but shock-absorbing or aggressive tread models grip wet tile and uneven pavement far better. Inspect them weekly and replace any set that is cracked or bald.
Materials and weight
Aluminum keeps costs manageable while staying light. Steel is heavier but more durable for higher weight capacities. Carbon fiber costs the most yet saves noticeable energy on long days because each crutch weighs under a pound. Hold the pair you plan to buy and imagine walking with them for an hour. If they already feel heavy, they will feel unbearable later.
Renting vs buying
Deciding between renting and buying comes down to timeline, features, and whether you expect to use the crutches again.
Quick math
Rentals average $10–$30 per month. Standard underarm crutches often cost $20–$40 to purchase, while ergonomic forearm models run $80–$300. Three months of rental fees usually equals the price of owning.
When renting makes sense
- Recovery is expected to last 4–6 weeks.
- You want to test a specific crutch style before committing.
- You need a stopgap pair while your preferred model ships.
When buying is smarter
- You will be on crutches for 3 months or longer.
- You have an ongoing condition that flares occasionally.
- You want ergonomic grips, lighter materials, or color options rental fleets rarely carry.
Inspecting rental crutches
Before you swipe your card, check the tips, pins, handles, and pads. If anything wiggles, squeaks, or looks cracked, request another pair or new accessories. The inconvenience of swapping them now beats a dangerous slip later.
| Situation | Rent? | Buy? | Why |
|---|---|---|---|
| Short term injury (4–6 weeks) | ✔ | No | Lower cost for brief use |
| Long recovery (3+ months) | No | ✔ | Ownership pays off quickly |
| Recurring condition | No | ✔ | Crutches stay ready for flare ups |
| Need ergonomic upgrades | No | ✔ | Rental fleets rarely stock premium gear |
| Trying a style before buying | ✔ | No | Rent first, then invest |
Match crutches to your daily life
Imagining real scenarios helps narrow the options faster than comparing spec sheets.
- Short sprain or fracture: Standard underarm crutches with upgraded grips keep costs low while staying comfortable for a few weeks.
- Ongoing condition: Invest in forearm crutches with ergonomic handles, quality tips, and replacement parts you can order quickly.
- Busy parent or student: Lightweight forearm crutches or a folding model make stairs, buses, and doorways easier. Pair with a slim backpack or belt bag for hands-free carry.
- Style-focused user: Forearm crutches blend into outfits more easily and come in colors that coordinate with the outfits in Fashion Tips for Crutches.
Keep track of what you carry, where you walk, and whether you rely on public transit. Those details influence which crutch features will actually get used.
Example “best fit” setups
Use these archetypes to guide your shopping list, then compare actual models in your price range.
Short term everyday comfort
- Type: Underarm crutches with upgraded grips.
- Specs: Height range 5'0"–6'2", weight capacity 250–300 lbs, shock-absorbing tips.
- Skip if: You plan to use crutches longer than 2 months or deal with narrow spaces daily.
Travelers and commuters
- Type: Lightweight forearm crutches (aluminum or carbon fiber).
- Specs: Under 1.5 lbs per crutch, ergonomic handles, open cuffs for quick release, compact footprint.
- Skip if: Budget is extremely tight or you only need crutches for a week.
Tall users
- Type: Forearm crutches with extended height ranges and adjustable cuff positions.
- Specs: Fits up to 6'6"+, supports 300+ lbs, independent cuff and handle adjustments.
- Skip if: You need an immediate pharmacy pickup; extended sizes are usually online-only.
Budget-friendly basics
- Type: Standard aluminum underarm crutches.
- Specs: $20–$40 price range, replaceable tips, foam grips you can upgrade later.
- Skip if: You are prone to wrist pain or expect rugged outdoor use.
Mistakes to avoid
- Choosing only by price. Five dollars saved on grips can cost you weeks of palm pain.
- Ignoring weight capacity. Crutches that flex or bend under load feel terrifying on stairs.
- Forgetting your environment. Bulky underarm crutches make tiny bathrooms miserable; forearm crutches need practice before big trips.
- Skipping a professional fit. Borrowed crutches rarely match your body out of the box.
- Using worn tips "just for today." Replace them before wet tile or rain turns a wobble into a fall.
Video-friendly fit check
Record or rehearse this sequence when you unbox new crutches. It doubles as a content idea for Reels while confirming fit basics.
- Stand in the shoes you will actually wear. Shoe height changes all measurements.
- For underarm crutches, ensure 2 finger widths between the pad and your armpit.
- Let your arms hang and adjust the handle so it lines up with your wrist crease.
- For forearm crutches, set the cuff 1–2 inches below your elbow and tighten until snug.
- Place the tips slightly forward and outward from your toes, then take a few steps to confirm your shoulders stay relaxed.
- If anything feels awkward (tips sliding or wrists straining), pause and adjust before heading outside.
Crutch buyer fast checks
- Provider cleared this crutch style for your injury or surgery.
- Height range and weight capacity cover you with the shoes you will wear most.
- Handles feel comfortable for at least ten minutes of use.
- Tips have deep tread and firm rubber with zero cracks.
- All buttons, bolts, and cuffs are tight before you leave the store.
Crutch type comparison
| Type | Typical use | Pros | Cons | Notes |
|---|---|---|---|---|
| Underarm (axillary) | Short term injuries, 4–8 weeks | Familiar, affordable, easy to rent | Bulky, can irritate underarms | Upgrade grips and tips for longer comfort |
| Forearm (Lofstrand) | Long term use or chronic conditions | More control, easier in tight spaces | Learning curve, higher cost | Worth the investment if you will use them for months |
| Platform | Hand or wrist injuries preventing gripping | Offloads pressure from wrists and hands | Heavier, harder to find, more expensive | Ask your provider before ordering |
| Knee scooter | Lower leg injuries, non-weight-bearing | No arm strain, fast indoors | Useless on stairs, bulky in tight areas | Great backup if crutches exhaust you |
FAQ: Buying or renting crutches
Renting usually wins for 4–6 week recoveries because the monthly fee is cheaper than purchasing new gear. If you know you will be on crutches for 3 months or longer, buying gives you better features and the option to customize handles or tips.
Inspect the tips for cracks, confirm the adjustment pins lock securely, squeeze the padding on the handles and underarm pads, and make sure every bolt is tight. If anything feels loose, ask for a replacement pair on the spot.
Forearm crutches tend to win for long timelines because they are lighter, more maneuverable, and keep pressure off your underarms. Underarm crutches are fine for short recoveries or when you need a readily available rental pair.
Your shoulders should feel relaxed, the underarm pad should sit about 2 finger widths below your armpit, and the handle should line up with your wrist crease. Your elbow should stay slightly bent when you walk. If anything feels off, ask your provider to refit them.
Absolutely. Talk to your doctor or physical therapist about knee scooters, walkers, or hybrid setups if crutches aggravate your wrists or feel unsafe. Many people swap between devices depending on distance and terrain.
Stay confident while shopping
The right crutches are the ones that fit your body, respect your energy, and match the terrain you cover every day. Underarm crutches excel when you only need a few weeks of backup, while forearm crutches become part of your wardrobe for months. Weight capacity, handle comfort, and tip condition matter more than logos.
Write down your height, weight, expected timeline, and daily routes before you shop. Use that list when you compare models or inspect rental gear. If something feels off, whether it is wobbly pins, squeaky tips, or shoulders cranking upward, speak up until it feels right.
Pair this guide with hand and wrist protection strategies, the exercise guide for staying strong, and the fashion roadmap so your entire routine feels coordinated.