Table of Contents
Introduction
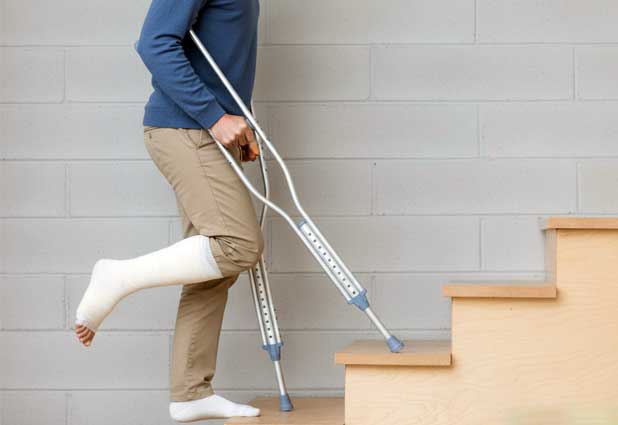
You're on crutches, staring at a staircase at home, work, or school, and your stomach drops. How to use crutches on stairs is usually the second question after “How do I shower?”. The advice you hear is all over the place: lead with the good leg, hold both crutches, just take the elevator. That confusion makes every step feel like a gamble.
This guide breaks down stair decisions for different environments such as carpeted steps at home, slick workplace stairwells, outdoor entries coated in rain, and short steps that barely qualify as stairs. You'll get step sequences, practice drills, safety checks, and straight talk about when to say no so you can move between floors with less panic.
If using stairs feels overwhelming or scary, try our calming confidence guide here.
The goal isn't heroics. It's predictable, repeatable routines that keep your hands on the grips, your weight centered, and your confidence intact.
Key Takeaways
- Get cleared first: Stair clearance from your provider is non-negotiable. Weight-bearing restrictions change which method you use.
- Rails change everything: A solid handrail on your stronger side gives backup if a crutch slips. Decorative rails that wobble are more dangerous than none.
- Descending is harder: Going down fights gravity and feels scarier. Doubling your time on descent is normal and smart.
- Not every stair is worth it: Wet outdoor steps, long flights without rails, and crowded stairwells are “no” stairs. Elevators exist for a reason.
- Repetition builds calm: Practicing on the same two steps a dozen times builds the muscle memory that makes a full flight manageable.
Safety Checks Before Any Stair Attempt
Provider clearance comes first. Ask your provider directly whether you're cleared for stairs and how much weight that injured leg can take. “Weight-bear as tolerated” looks different on a staircase than on flat ground.
Inspect the staircase like a safety auditor. Give the handrail a shove before you climb. Check lighting, clutter, wet spots, even pets that might dart across your path. Decide if this staircase earns a yes, a maybe with a helper, or a hard no.
Practice in a low-stakes setting. Two steps with supervision at home teach you more than a shaky solo effort on a 20-step office stairwell. Rehearse the pattern on a safe staircase until it feels automatic.
Know when to refuse. Broken rail? Wet tile? Dim stairwell? You can say, “I'll take the elevator.” That's not weakness; it's a safety decision.
Important Safety Reminder
This guide is educational. Your healthcare provider or physical therapist must tailor stair instruction to your injury, strength, and balance. Follow their method first and practice with supervision before attempting stairs alone.
How I Tested Stair Methods
I dedicated three weeks to stair experiments on five staircases: carpeted stairs with a left rail at home, an apartment concrete stairwell with rails on both sides, polished stone office stairs with one rail, outdoor library steps with no rail, and bare wood stairs with a right rail at a friend’s house.
I ran tests with underarm crutches for two weeks, then forearm crutches for week three. I compared quiet morning stairwells to afternoon traffic, tracked spill risks, timed ascents versus descents, and noted how surfaces, weather, and fatigue changed my confidence.
I also tested carrying items on stair days: backpacks, crossbody bags, even a misguided attempt to carry a travel mug (spoiler: it stayed at the bottom). Those experiments shaped the carrying strategies later in this guide.
Overview of Stair Options on Crutches
Handrail + crutches. This is the most common setup once you are cleared. You hold the rail with your stronger hand and both crutches in the other, following “good leg leads up, bad leg leads down.”
No reliable rail. Decorative rails, narrow walls, or zero rail require alternative positioning, helper support, or skipping the staircase entirely.
Scooting. For very short flights, some people sit and scoot up or down with help. It's slow, but it's safer than falling. Only attempt it with provider approval.
Avoiding the stairs. Ramps, elevators, or rearranging your life onto one level can be the safest choice for the first weeks or for high-risk staircases.
Method 1: Stairs with a Reliable Handrail
Choosing Rail and Crutch Positions
Use the handrail on your stronger side whenever possible. Stand close enough that your shoulder almost grazes the wall. Keep crutch tips near the middle of the tread, not hanging over the edge. Eyes stay on the next step, not your feet.
My stability improved instantly when I moved closer to the wall and rail. Staying in the center of the staircase felt like walking a balance beam.
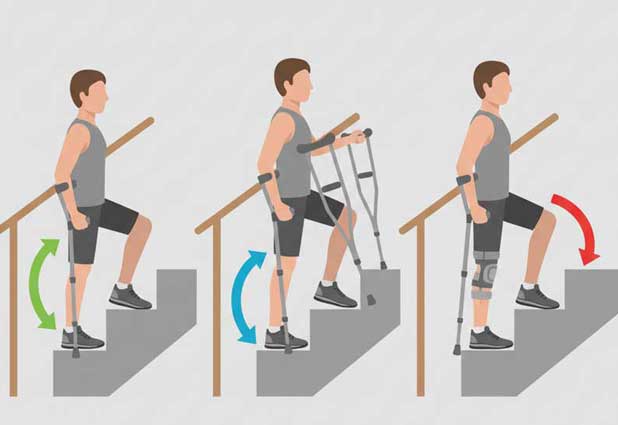
Going Up: Sample Sequence
- Face the stairs. Hold the handrail with the stronger hand and both crutches in the other.
- Push down on the rail and crutches. Step up with the stronger leg first.
- Bring both crutches up to that step while the stronger leg carries your weight.
- Bring the weaker or injured leg up to join them.
- Repeat. Remember “good leg leads going up.” Pause on any step when you need a breather.
The first week, a 12-step flight took me 20 seconds. By week three, I trimmed it to 12 seconds without rushing. Practice turned terror into routine.
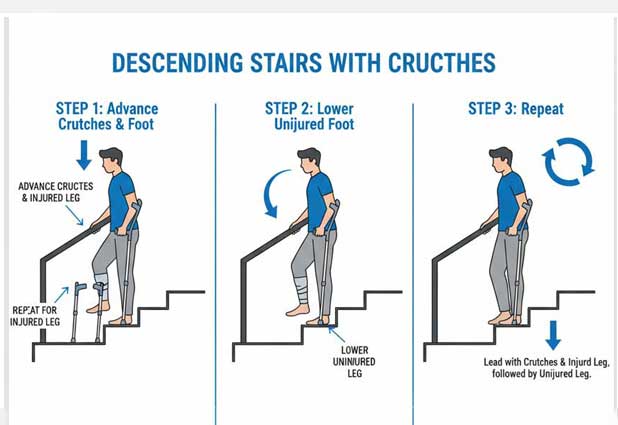
Going Down: Sample Sequence
- Stand at the top facing down. Handrail in the stronger hand, both crutches in the other.
- Move both crutches to the next lower step and make sure the tips have full contact.
- Lower the weaker leg to that same step.
- Bring the stronger leg down last.
- Repeat slowly. “Bad leg leads going down” kept me honest when nerves kicked in.
Pro Tip
Run mini laps on the same two or three steps ten times before tackling a full flight. Short, repeatable reps build coordination faster than a single white-knuckle attempt on a long staircase.
Method 2: Short Stairs and No-Rail Situations
Single steps or low stoops. If cleared, you may be able to step up with the stronger leg while both crutches stay on the lower level, then bring everything up together. Some users hop if fully non-weight-bearing, but that requires serious arm strength and explicit approval.
Flights with no rail. My five-step experiment without a rail ended with me scooting down on my backside because my balance felt sketchy. Without a solid rail, you have zero backup if a tip slips. Most of the time, the safe call is to refuse the staircase.
Scooting. Sitting on each step and moving one at a time with a helper carrying the crutches is slow but stable for certain injuries. Ask your provider before trying it so you do not twist the wrong way.
Say no without guilt. “No rail, no go” became my mantra for offices with decorative staircases. Someone from facilities would open a service elevator, and everyone survived.
Method 3: Carpeted vs. Hard Stairs
Carpeted Home Stairs
Carpet gives crutch tips more grip, but it hides the edge of each tread. Turn on bright lights, clear clutter, and check for loose spots before every climb. Carpeted stairs felt forgiving when I bobbled, yet I still slowed down because dim lighting made depth tricky.
Hard Stairs at Work or School
Concrete, stone, or hardwood stairs show every edge clearly, which I loved, but they become slick if dusty or wet. I planted crutch tips in the middle of each tread, not near the lip, and waited for crowds to pass so I was never rushed. Replace worn crutch tips before they turn into ice skates.
Method 4: Outdoor and Winter Stairs
Outdoor steps deal with rain, leaves, snow, and ice. Even light drizzle turned my office’s stone stairs into slip-and-slides. Halfway down I lost traction and caught myself on the rail; after that I used the ramp whenever the forecast looked messy.
Wet stairs. Slow to half-speed and plant crutch tips firmly in the middle of each tread. If there is any ice, choose a ramp or different entrance.
Debris. Brush away leaves with a crutch tip before stepping. Pine needles and gravel act like ball bearings.
Winter tips. Swap to non-slip or spike-style tips for seasons with snow. They grip outdoors without tearing indoor floors. Our winter accessories guide has tested options.
I happily walked two extra minutes to a covered ramp when it rained. The detour was faster than recovering from a fall.
Bags, Backpacks, and Stair Planning
Your hands belong on the grips and the rail. Anything you cannot stash in a backpack or pocket stays put. The one time I tried to carry a water bottle, I realized I was clutching it instead of the rail by step three.
Use two-shoulder backpacks. Keep loads under ~10 pounds, tighten the straps so the pack rides high, and remove bulky keychains that swing while you climb.
Stage duplicates. Leave chargers, notebooks, and water bottles on each floor when possible so you are not hauling them up and down.
Need to carry more? Pair this guide with our carry systems article for rolling carts, counter slides, and hands-free ideas that keep stair trips light.
When Stairs Are Not the Answer
Fatigue and pain. Exhausted arms or throbbing legs slow your reaction time. Elevators, ramps, or asking for help become the safest choice.
Heavy or awkward loads. Moving boxes? Large packages? Save them for someone with two hands free.
Long stair runs. Three flights to a fourth-floor office drained my energy. I took the elevator and saved my stair practice for the short flight at home.
Mobility alternatives. Knee scooters or wheelchairs reduce fatigue for campuses or airports. Check our knee scooter reviews and premium crutch comparison if you need more support.
Rearranging spaces. Many people temporarily move bedrooms or work setups downstairs. It is not giving up; it is smart logistics.
Stair Scenario Comparison
| Stair Type | Rail Setup | Suggested Method | Key Risk | Helpful Accessory |
|---|---|---|---|---|
| Home carpet | One-sided rail | Handrail + crutches, good leg leads up | Hidden edges, dim light | Bright bulbs, rail padding |
| Office concrete | Rails on both sides | Pick stronger side rail, slow pace | Crowds, slick floors | Fresh crutch tips, off-peak timing |
| Outdoor entry | One rail or none | Use covered entrance or ramp when wet | Rain, leaves, ice | Winter tips, helper support |
| School stairwell | Rails both sides | Wait for crowds to pass, hug the wall | Pressure to rush | Elevator pass, early arrival |
| Single step | Usually none | Step with strong leg or hop if cleared | Easy to underestimate | Portable ramp if available |
Decision Table: Stairs vs. Alternatives
| Situation | Recommended Choice | Reason |
|---|---|---|
| Severe fatigue after long day | Elevator or ask for help | Fatigue reduces balance and grip strength |
| Carrying heavy backpack | Stage gear on each floor or use elevator | Heavy loads shift center of gravity |
| Icy outdoor steps | Use ramp or alternate entrance | Ice is an unacceptable fall risk |
| Crowded rush-hour stairwell | Wait for crowd to clear | Peer pressure leads to rushing and slips |
| Practiced home stairs with good lighting | Use handrail method | Familiar routine builds confidence |
| Multi-story campus commute | Consider knee scooter or wheelchair | Devices save energy on long routes |
Stair Safety Fast Checks
Before You Climb
- Cleared by provider: You know your weight-bearing limits for stairs.
- Lighting dialed: Every tread edge is visible, no shadows.
- Rail tested: It does not wobble when you push.
- Tip check: Rubber tips show tread and are not cracked.
- Hands free: No coffee, phones, or bags distracting your grip.
Common Stair Mistakes
- Attempting stairs before clearance. A friend tried three days post-surgery, fell, and added weeks to recovery.
- Rushing because someone sighs behind you. The day I sped up for an impatient coworker was the day my crutch slipped.
- Multitasking. Texting or talking pulls your focus away from foot placement.
- Carrying items in your hands. Backpacks and pockets exist for a reason.
- Ignoring worn crutch tips. Smooth rubber on hard stairs equals ice.
- Testing a brand-new method on a long flight. Learn the motion on two steps first.
What Actually Happened
Week two, day four: I was late for a meeting, rushed down the stairs, someone brushed my shoulder, and my crutch skidded. I caught myself on the rail, shook for five minutes, and arrived late anyway. After that I gave myself a three-minute buffer and never rushed a staircase again.
FAQ: Using Crutches on Stairs
It can be when your provider clears you, the rail is solid, steps are dry and well lit, and you practice the approved method. Start with one or two steps and a helper before attempting a full flight alone.
Hold the rail with your stronger hand, both crutches in the other. Push down, step up with the stronger leg, then bring the crutches and weaker leg to the same step. Repeat slowly and pause when needed.
Keep your weight close to the rail. Move the crutches and weaker leg down first, then follow with the stronger leg. Take your time and let people pass. Descending is supposed to be slow.
No-rail stairs are high risk. Ask for professional instruction, install a temporary rail, scoot with help, or avoid those stairs until a safer option exists.
Skip them when you are exhausted, in pain, carrying bulky items, facing ice or water, or when the rail is unstable. Ramps and elevators protect your recovery.
Carpet grips better but hides edges. Hard stairs highlight edges but get slick. Adjust lighting, pace, and tip selection based on the surface.
Final Thoughts
Learning how to use crutches on stairs is about picking the safest option for the staircase in front of you, not proving anything to strangers in the stairwell. Get clearance, rehearse the method that matches your injury, keep hands on the grips, and choose alternate routes when a staircase feels sketchy.
Walk through the stair safety checklist at home and work. Test the rail, change dim bulbs, replace worn tips, and practice on short sections with supervision. Over time the motions feel routine, and “stairs” stops being synonymous with “panic.”
Ready to Make Stairs Safer?
Check your lighting, test your handrail, inspect your crutch tips, and rehearse the sequence on two safe steps before your next commute.
Explore More How-To Guides