Table of Contents
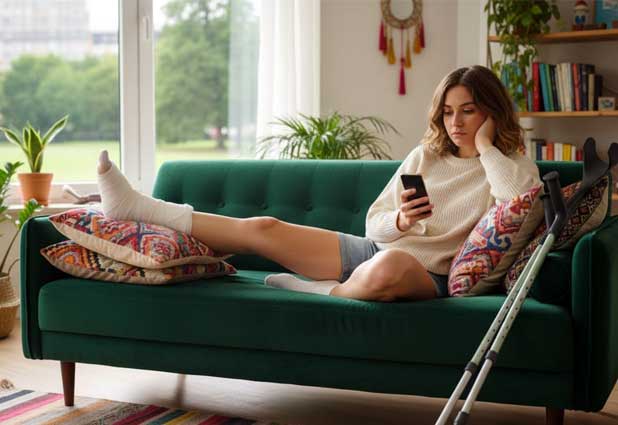
Your first week on crutches feels like learning to walk all over again. Every doorway is suddenly too narrow. Your hands hurt after five minutes. Simple tasks like carrying coffee or getting dressed take twice as long, and you're exhausted by noon.
I spent months on crutches after ankle surgery, and I tested dozens of small adjustments at home, at work, and around town to figure out how to make life on crutches easier without spending a fortune or rearranging my entire life.
The good news? You don't need to master crutches. You need to change your environment. Small tweaks like clearing floor pathways, setting up crutch parking spots, and using the right bags make every day smoother, safer, and way less frustrating.
Key Takeaways
- Rearrange once, benefit daily: Move everyday items to reachable shelves and clear floor pathways to cut trips and prevent falls.
- Carry smarter, not harder: Crossbody bags and fanny packs keep essentials accessible while keeping your hands free for balance.
- Set up crutch parking spots: Designated lean spots by your bed, couch, and bathroom prevent crutches from sliding and save you from hunting for them.
- Upgrade comfort, reduce pain: Handle padding, cycling gloves, and proper height adjustments dramatically reduce hand strain.
- Pace yourself on purpose: Plan one or two major tasks per day with built-in rest breaks to avoid exhaustion and frustration.
How I Tested These Crutch Life Hacks
I tested these tips in my one-bedroom apartment over eight weeks, paying attention to what actually saved time, reduced pain, or prevented near-falls.
Where I tested: Inside on hardwood floors, tile bathroom, and carpeted bedroom. Outside on sidewalks, parking lots, grocery stores, and my office building with elevators and stairs.
What I tracked: How many trips it took to move laundry or groceries, how often I had to ask someone to grab things for me, how sore my hands felt after 30 minutes of walking, and how many times I almost slipped or dropped something.
My test rule: If a hack didn't save me at least two trips per day or reduce hand pain noticeably within three days, I ditched it. I kept the ones that worked even when I was tired, rushing, or carrying things.
The result is this list of daily crutch tips that made my life genuinely easier, not just theoretically better.
Crutch Life Hacks at Home
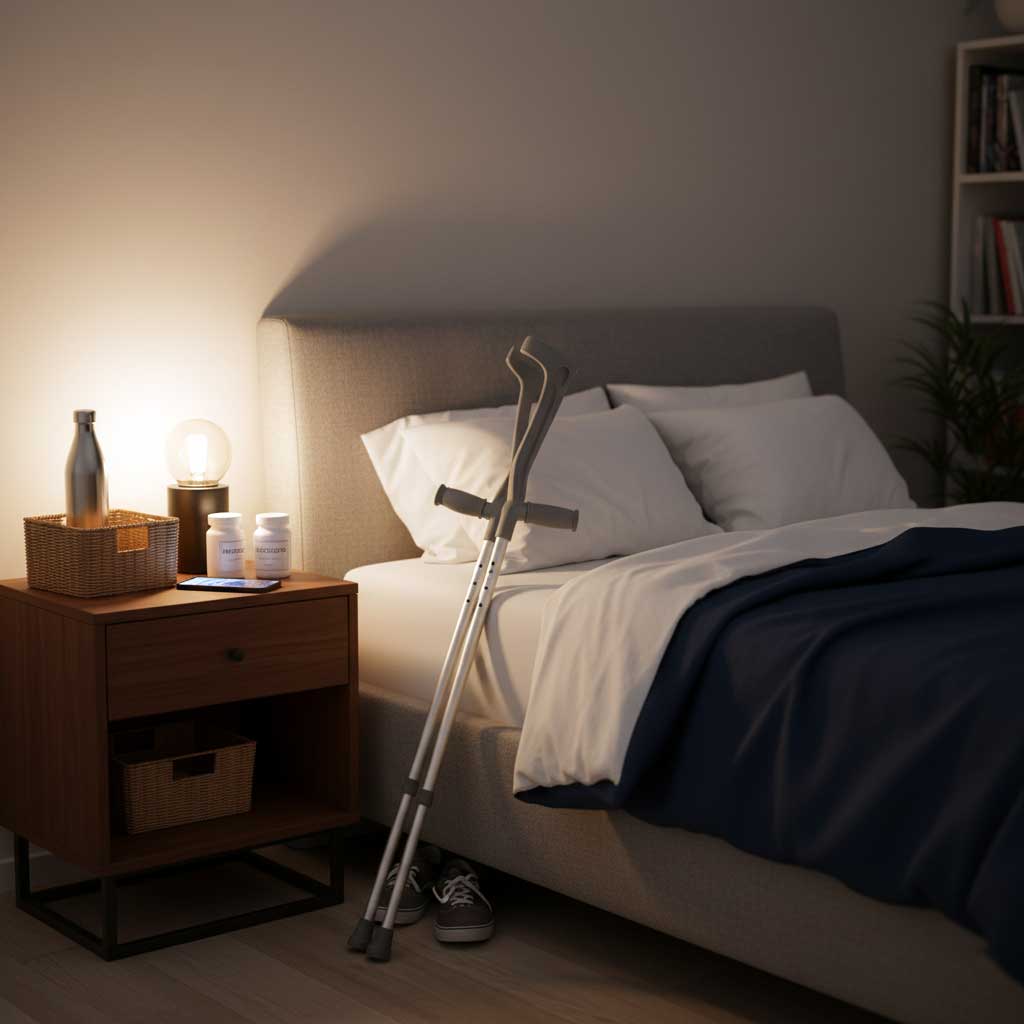
Set Up Safe Parking Spots for Your Crutches
Crutches slide. A lot. I learned this the hard way when mine clattered to the floor at 2 a.m. and I nearly fell trying to grab them in the dark.
The fix: Create designated parking spots where your crutches can lean securely or hang within easy reach.
Where to set up spots:
- By your bed: Lean them in the corner between the nightstand and wall, or hang them on a sturdy hook.
- By the couch: Lay them flat on the floor next to the couch, or lean them against the armrest with the handles hooked over.
- By the bathroom door: Use a towel rack or command hook at shoulder height to hang them while you're inside.
- Near the shower: A tension rod shower caddy or wall hook works great if you have space.
I hung a simple command hook next to my bed and another by the bathroom. It took five minutes to install both, and I stopped hunting for my crutches every time I sat down.
Rearrange Your Essentials Once
Reaching for things you use every day becomes exhausting when you're on crutches. I rearranged my apartment once during the first week, and it saved me dozens of trips over the next two months.
What to move to reachable height:
- Coffee mugs, plates, and snacks to the lowest kitchen shelf
- Toiletries and towels to the middle bathroom shelf (not the top one)
- Phone chargers and remotes to the coffee table or nightstand
- Frequently worn clothes to the lowest dresser drawer or a basket on the floor
I moved my favorite coffee mug, granola bars, and peanut butter to the lower cabinet shelf. That one change eliminated the need to balance on one leg while stretching for the top shelf three times a day.
Bonus tip: Use small baskets or trays to group items. I kept a bedside basket with my phone, water bottle, lip balm, and medications so I didn't have to crutch to the bathroom for every little thing at night.
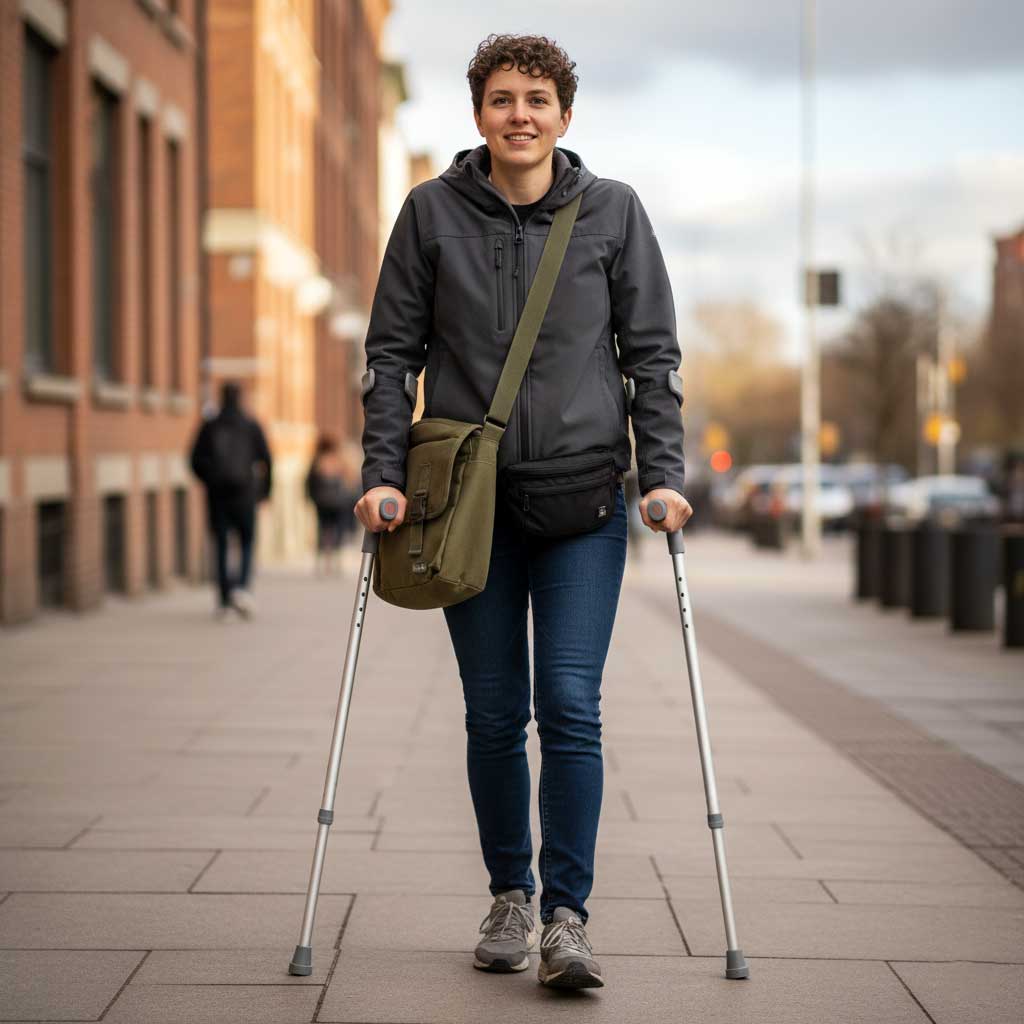
Use the Right Bags and Pockets
Your hands need to stay on the crutches for balance, which means traditional carrying doesn't work. I tried stuffing things in my pockets, holding bags in my teeth, and tucking items under my arms. None of it worked well.
Here's what actually helped me carry things on crutches:
Crossbody bag: I wore a medium crossbody bag every day. It held my phone, wallet, keys, and a small water bottle. The strap sat diagonally across my chest and didn't slide around or bounce when I walked.
Fanny pack (seriously): For quick errands, a fanny pack around my waist held essentials without feeling bulky. I know it's not the coolest look, but it kept my phone and keys secure and accessible.
Hoodie pocket: A hoodie with a big front pocket became my go-to at home. I could toss my phone, a snack, and the TV remote in there and still move around.
Backpack: For bigger hauls like groceries or work supplies, a backpack distributes weight evenly across your shoulders. Just don't overload it, or you'll throw off your balance.
What I kept in each:
- Crossbody bag: Phone, wallet, keys, small notebook, pen, hand lotion, travel-size pain reliever
- Fanny pack: Phone, keys, credit card, small snack
- Backpack: Laptop, chargers, lunch, water bottle, extra socks (wet shoes happen)
Carrying Things on Crutches Without Losing Your Mind
Hands-Free Carries That Actually Work
Trying to carry a coffee mug while using crutches is a recipe for spills and near-falls. I learned to think in stages and use surfaces, not my hands.
Coffee and drinks: Use a travel mug with a screw-top lid. Put it in the side pocket of your crossbody bag or backpack. If you don't have pockets, slide the mug along the counter to the table, then sit down and drink it there. Don't try to carry an open mug.
Small items: Phones, snacks, and remotes fit in hoodie pockets, cargo pants pockets, or fanny packs. I kept my phone in my hoodie pocket at home and switched to a crossbody bag when I went out.
Laundry and big items: Use a backpack for manageable loads, or drag a laundry basket along the floor. I gave up trying to carry laundry in my arms after I dropped a pile of clean clothes twice. Now I slide the basket from room to room, or I do smaller loads more often.
Kitchen Hacks
The kitchen was my biggest challenge. Hot pans, sharp knives, and the need to carry food across the room don't mix well with crutches.
Slide, don't carry: Push plates, bowls, and mugs along the counter instead of carrying them. I made breakfast by sliding my plate from the toaster to the table edge, then crutched over and sat down.
Stage everything first: Set all your ingredients and dishes on the counter or table before you start cooking. Then you can work from one spot without needing to hop back and forth to the fridge or pantry.
Use a tray with a damp towel under it: I put a small silicone mat or damp dish towel under a tray, set my plate and drink on top, and slid the whole setup from counter to table. The towel kept it from sliding too fast.
One-pot meals: Sheet pan dinners and slow cooker recipes saved me. Less movement, fewer dishes, and I could set everything up at once.
What Didn't Work
I tried using a small shoulder tote to carry things between rooms. It kept sliding down my arm and hitting my crutch, which threw off my balance. Crossbody bags and backpacks stay put way better.
Daily Crutch Hacks Quick Reference
| Situation | Hack | What You Change | Benefit |
|---|---|---|---|
| Getting coffee in the morning | Use lidded travel mug in crossbody bag pocket | Switch from open mug to secure container | No spills, hands stay on crutches |
| Finding crutches after sitting | Set up parking spots with hooks or corner lean | Add hooks by bed, couch, bathroom | Crutches don't slide or fall, easy to grab |
| Reaching items on high shelves | Move everyday items to lower shelves | Rearrange kitchen and bathroom once | Fewer trips, no climbing or balancing |
| Hand pain after 20 minutes | Add foam padding or wear cycling gloves | Upgrade grips or gloves | Distribute pressure, reduce soreness |
| Slipping on wet tile | Upgrade to non-slip crutch tips | Replace rubber tips with textured grip tips | Better traction, less fear on wet floors |
| Carrying groceries | Use backpack or online pickup service | Switch to hands-free carry or curbside | Keep balance, avoid multiple trips |
| Navigating work or school | Ask for closer parking and elevator access | Request temporary accommodations | Less walking, more energy for tasks |
| Night bathroom trips | Park crutches by bed, use night light | Add hook and plug-in night light | Safe navigation in the dark, no stumbling |
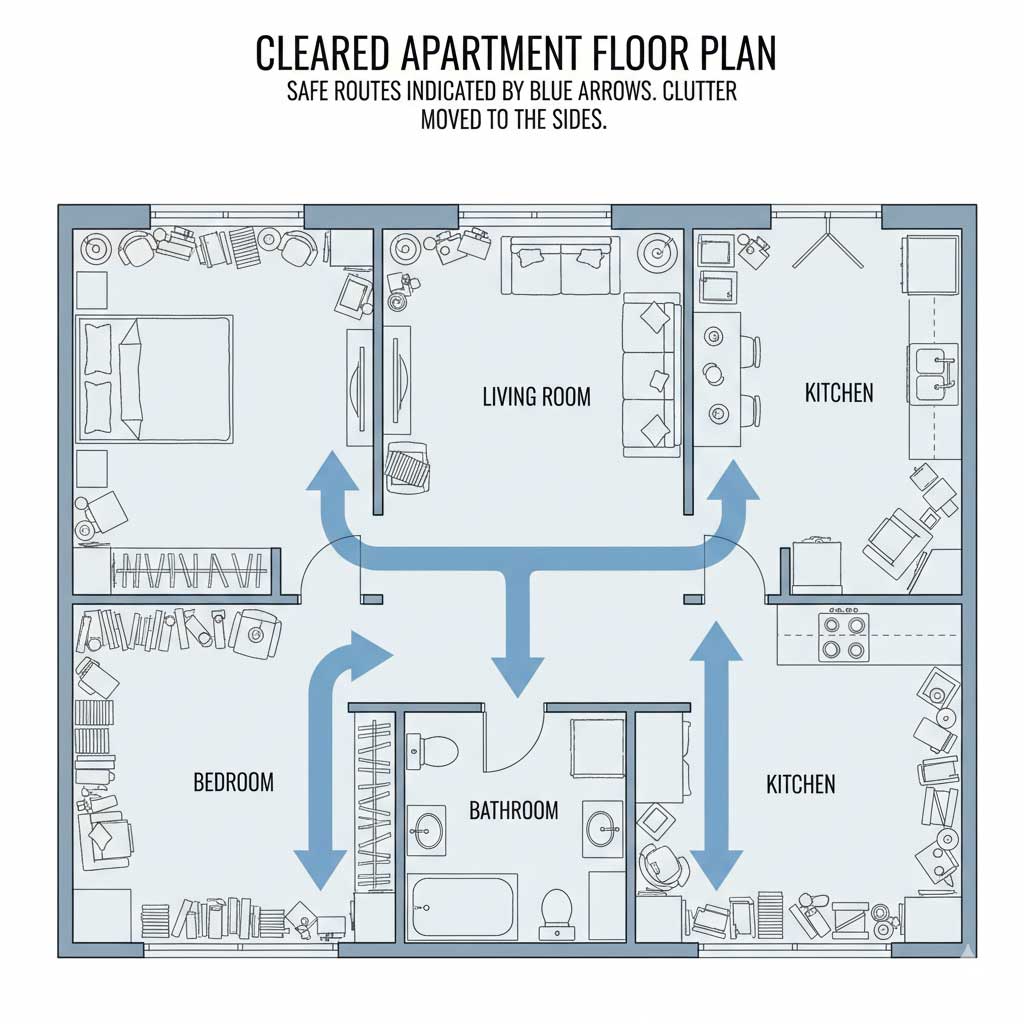
Safer Floors and Entryways
I almost fell three times in my first week on crutches, all from preventable floor hazards. A sliding bath mat, a phone charger cord stretched across the hallway, and a damp kitchen floor nearly took me down.
Making your floors safer doesn't require major renovations. It takes one sweep through your home to spot and fix the hazards.
Quick floor safety checklist:
- Remove sliding rugs: Take up any rugs that aren't secured with non-slip pads underneath, especially in bathrooms and kitchens.
- Clear pathways: Move shoes, pet toys, cords, and bags off your main walking routes. I cleared a straight path from bedroom to bathroom and kitchen.
- Dry wet spots immediately: Wipe up splashes, rain tracked in from outside, or pet water bowl spills right away. Wet tile and crutch tips don't mix.
- Tape down cords: Use cord covers or painter's tape to secure charger cables and lamp cords along baseboards instead of across the floor.
- Improve lighting: Add plug-in night lights between your bedroom and bathroom so you can see where you're stepping at night.
I removed my bathroom rug entirely after it slid under me. I also moved my dog's toy basket from the middle of the living room to the corner. These small changes made me feel way less anxious about walking around at home.
Safety Note
If you're using crutches on tile, consider upgrading to non-slip crutch tips. Standard rubber tips can slide on wet or polished floors. I switched to textured grip tips after a close call on damp tile, and they made a huge difference. You can also check out recommendations in our guide to best crutch accessories for winter for tips that work in rain and snow.
Getting Around Outside, Work, and School
Navigating Work or School on Crutches
Going back to work or school on crutches felt overwhelming at first. Long hallways, stairs, and needing to carry a laptop made every day exhausting.
Here's what made it manageable:
Ask for temporary accommodations: I requested closer parking and permission to use the staff elevator instead of stairs. Most workplaces and schools have ADA accommodations for temporary injuries. Don't be shy about asking.
Set up a desk stash: I kept a small bin under my desk with snacks, a water bottle, pain reliever, hand lotion, and a pair of slip-on shoes. That way I didn't need to make extra trips to the break room or my car during the day.
Use a backpack or messenger bag: I carried my laptop, chargers, and lunch in a sturdy backpack. Messenger bags work too, but make sure the strap is adjustable and doesn't slide off your shoulder.
Plan your schedule strategically: I asked my manager to cluster my meetings in the same building wing so I wasn't crutching back and forth all day. At school, try to schedule classes in adjacent buildings or with longer breaks between them.
Communicate with supervisors or professors: Let them know you might need extra time to get to meetings or class. Most people are understanding if you give them a heads-up.
Errands and Grocery Hacks
Grocery shopping on crutches is one of the most frustrating tasks. You can't push a cart and use crutches at the same time, and carrying bags is impossible.
What worked for me:
Use a shopping cart as a walker: I leaned my crutches against the cart handle and pushed it through the store. This only works if you're allowed to put a little weight on your injured leg. If you're non-weight-bearing, this isn't an option.
Switch to grocery pickup or delivery: This was my go-to for the first month. I ordered online and picked up at the curb, or I paid for delivery. It cost a few extra bucks but saved me hours of frustration.
Ask store staff for help: Most grocery stores will push your cart to your car and help you load bags if you ask. Don't feel embarrassed. That's what they're there for.
Consider a knee scooter for big stores: If you're going to be on crutches for more than a few weeks and you do a lot of shopping or campus walking, a knee scooter might be worth renting. They let you rest your injured leg on a padded platform while you push with the other foot, and most have baskets. Check out our best knee scooter reviews to see if one makes sense for your situation.
Stairs, Curbs, and Public Transport
Stairs on crutches are doable, but they require planning and focus. I'm not going to give step-by-step instructions here because that's medical advice territory, but here's what helped me in daily life:
Plan routes with fewer stairs: I scoped out buildings ahead of time to find ramps and elevators. If I had to take stairs, I made sure I had a handrail and wasn't rushing.
Practice curbs first: Curbs are like mini-stairs. I practiced stepping up and down curbs in my neighborhood before I tried a full staircase.
Use public transit strategically: Buses with kneeling features and subway elevators made my commute way easier. I checked transit apps for accessible routes before I left the house.
Give yourself extra time: Everything takes longer on crutches. I started leaving 15 minutes earlier than usual for appointments and errands so I didn't feel rushed or stressed.
Comfort Upgrades That Make Crutch Life Easier
Standard hospital crutches are functional, but they're not comfortable. After a week of sore hands and chafed underarms, I made a few upgrades that dramatically improved my daily comfort.
Handle Padding and Gloves
My hands hurt after 20 minutes of using crutches, especially on the first day. The hard plastic grips dug into my palms and left red marks.
What helped:
- Foam grip covers: I bought inexpensive foam covers that slip over the existing handles. They added about half an inch of cushioning and made a huge difference. Cost: $10 to $15.
- Cycling gloves: Padded cycling gloves with the fingers cut off distribute pressure across your palms. I wore these every day and my hands stopped hurting by the end of week two. Cost: $15 to $25.
- Gel handle wraps: If you want more cushioning, gel wraps offer better shock absorption than foam. They cost a bit more ($20 to $30) but last longer.
I started with foam covers and added cycling gloves after a few days. That combo worked great for me.
Non-Slip Crutch Tips
The rubber tips on standard crutches wear out quickly and don't grip well on wet or polished floors. I slipped twice on damp tile before I upgraded to non-slip tips.
What to look for: Textured rubber tips with deeper treads, or specialty tips designed for ice and snow. These cost $10 to $20 per pair and last about three months of daily use.
I switched to all-weather tips and felt way more confident walking in light rain or on slick grocery store floors. Our best crutch accessories for winter guide has more options if you're dealing with snow and ice.
Forearm Crutches vs Underarm Crutches
I used underarm crutches for the first month because that's what the hospital gave me. They worked, but they weren't comfortable for long walks.
Halfway through my recovery, I borrowed a friend's forearm crutches to try them out. The difference was noticeable:
Forearm crutches: Weight goes through your forearms instead of your armpits, which feels way more natural after you get used to them. Your hands grip the handles at a more ergonomic angle, and you can let go to open doors or grab things without dropping the crutches. They take a few days to learn but feel better for all-day use.
Underarm crutches: Easier to learn at first, and they provide more upper body support if you're weak or tired. But they can cause armpit soreness and nerve irritation if you lean on them wrong.
For short-term use (a few weeks), underarm crutches are fine. If you're going to be on crutches for more than a month, consider trying forearm crutches. I wish I'd made the switch sooner.
If you're wondering whether high-end crutches like Mobilegs are worth the money, check out our article on are expensive crutches worth it. Spoiler: sometimes yes, depending on how long you'll be using them.
Bags and Carrying Options Compared
| Bag Type | Best Use | What It Fits | When to Skip It |
|---|---|---|---|
| Crossbody bag | Daily essentials, errands, work | Phone, wallet, keys, small water bottle, snacks | If you need to carry a laptop or large items |
| Fanny pack / waist bag | Quick errands, around the house | Phone, keys, credit card, lip balm | If you need more than bare essentials |
| Backpack | Work, school, groceries | Laptop, books, lunch, change of clothes, water bottle | If you can't manage the weight on your shoulders |
| Hoodie front pocket | At home, casual around the house | Phone, remote, small snack | Outside or professional settings |
| Cargo pants pockets | At home, neighborhood walks | Phone, keys, small items | If pockets are too shallow or items bounce |
| Tote or shoulder bag | Rarely works well | - | Almost always - slides down arm and hits crutch |
Energy, Pain, and Pacing Yourself
Using crutches burns way more energy than normal walking. I was exhausted by early afternoon during my first week, even though I wasn't doing anything intense.
The biggest mindset shift for me was realizing that pushing through fatigue made everything harder. Once I started pacing myself intentionally, my days got way more manageable.
What pacing actually looks like:
Plan one or two major tasks per day: I used to try to run errands, do laundry, cook dinner, and clean the apartment all in one day. On crutches, that was impossible. I learned to pick one or two bigger tasks per day and let the rest wait.
Sit down for tasks where possible: I chopped vegetables while sitting at the kitchen table, folded laundry on the couch, and worked at my desk instead of standing. It felt lazy at first, but it conserved energy for things I actually had to stand for, like showering.
Take rest breaks every 20 to 30 minutes: I set a timer on my phone to remind me to sit down for five minutes after extended walking or standing. My hands and shoulders thanked me.
Use visual cues for energy limits: I put a sticky note on my bathroom mirror that said "Pick 2 today" to remind me not to overdo it. It sounds silly, but it worked.
Listen to your body: If your hands, shoulders, or armpits are hurting, stop and rest. Pushing through pain leads to overuse injuries that make recovery take longer.
Follow Your Provider's Instructions
Pacing yourself doesn't mean ignoring medical advice. If your doctor or physical therapist gave you weight-bearing restrictions or activity limits, follow them. These tips are about managing energy and comfort within those boundaries, not changing your recovery plan.
How my day felt before and after pacing:
Before: I tried to do everything in one marathon push in the morning, then collapsed on the couch by noon, too tired to make lunch or take care of basic tasks.
After: I picked two things (grocery pickup and one load of laundry), built in rest breaks, and had energy left for cooking dinner and hanging out with friends in the evening.
Pacing doesn't mean doing less overall. It means spreading tasks out and resting in between so you're not constantly drained.
Crutch Life Fast Checks
Use this checklist to set up your home for safer, easier crutch life. Check off each item as you complete it:
Crutch Life Hacks for Sleep and Nighttime
Nighttime bathroom trips are scary when you're half asleep and trying to grab crutches in the dark. I knocked over a water glass and stubbed my toe twice before I figured out a better system.
Where to park crutches at night: Lean them in the corner between your nightstand and bed frame, or hang them on a sturdy hook within arm's reach. Don't lay them flat on the floor where you might step on them or trip over them.
Keep essentials within reach: I kept a small basket on my nightstand with my phone, water bottle, pain reliever, lip balm, and a small flashlight. That way I didn't have to crutch to the bathroom for every little thing.
Use a night light: I plugged a dim night light into the outlet between my bedroom and bathroom. It gave me just enough light to see where I was stepping without being bright enough to wake me up completely.
Avoid tripping over gear: I moved my charging cables to the nightstand and pushed my shoes under the bed. Clearing the floor around my bed made nighttime navigation way less stressful.
One trick that made nighttime trips less chaotic: I practiced the route from bed to bathroom with the lights on during the day, counting steps and noting where I needed to turn. That muscle memory kicked in at night and made me feel way more confident in the dark.
FAQ: Daily Life on Crutches
The best hands-free options are crossbody bags, fanny packs, and backpacks. For drinks, use a lidded travel mug in your bag's side pocket. In the kitchen, slide items along the counter instead of carrying them, or stage everything at the table first, then crutch over once. Small items like phones and snacks fit well in hoodie pockets or cargo pants.
Add foam padding or gel covers to the hand grips. Cycling gloves with padded palms help distribute pressure. Adjust your crutch height so your elbows bend at about 15 to 20 degrees when standing. Take rest breaks every 20 to 30 minutes to give your hands a break. If pain persists after these adjustments, consider upgrading to ergonomic crutches or forearm crutches with better weight distribution.
Start with five fast changes: remove or secure sliding rugs, clear main pathways of cords and clutter, set up crutch parking spots by your bed and couch, move everyday items to reachable shelves, and keep a basket of essentials on your nightstand. Widen narrow pathways by moving furniture slightly, and make sure you have good lighting for nighttime bathroom trips.
Knee scooters can be much easier for longer distances like grocery stores, college campuses, or shopping malls. They let you rest your injured leg on a padded platform while you push with the other foot, and many have baskets for carrying items. The downside is they don't work well on stairs, tight spaces, or uneven outdoor terrain. Many people use both: crutches at home and a knee scooter for longer outings. Check out our best knee scooter reviews to see if one makes sense for your situation.
Ask for temporary accommodations like closer parking, elevator access, or moving your desk closer to the restroom. Keep a stash of snacks, water, and pain-free shoes under your desk so you don't have to make extra trips. Use a backpack or messenger bag to carry your laptop and supplies hands-free. Plan your schedule to minimize walking between classes or meetings, and communicate with supervisors or professors about needing extra time to get places.
The main fixes are adding padding, wearing gloves, adjusting crutch height, and taking breaks. Foam grip covers or gel wraps cushion the handles, and cycling gloves with padded palms distribute pressure better. Make sure your crutches are adjusted so your elbows bend slightly when you grip the handles. Rest every 20 to 30 minutes, and if pain continues, consider switching to forearm crutches or upgrading to ergonomic models with better grip design.
For long distances, many people prefer knee scooters because they're less tiring and let you carry things in the basket. Some people use wheelchairs for extended outings, especially if they're non-weight-bearing for a long time. Forearm crutches are also more comfortable than underarm crutches for all-day use. The best option depends on your injury, weight-bearing status, and where you need to go. Talk to your doctor or physical therapist about alternatives if crutches are making daily life too difficult.
Start Making Life on Crutches Easier Today
You don't need to be an expert at using crutches to make daily life manageable. The real trick is changing your environment so it works with your limitations, not against them.
Small adjustments like clearing floor pathways, setting up crutch parking spots, using crossbody bags, and moving essentials to reachable shelves make every single day smoother. These aren't complicated hacks. They're practical changes that save energy, reduce pain, and help you feel less frustrated.
The strategies I shared here are what actually helped me figure out how to make life on crutches easier during my recovery. Pick three of them to try today. Set up your crutch parking spots, rearrange one shelf, and choose a hands-free bag. See how you feel after a few days, then adjust from there.
Life on crutches is temporary, but feeling capable and comfortable during recovery makes a huge difference. Set up your space tonight, and give yourself permission to rest when you need to. You'll be surprised how much easier everything gets when your environment is working for you.
Your Next Step
Tonight, pick three fast changes from the checklist above: park your crutches securely by your bed, clear one main pathway, and move three items you use daily to a lower shelf. That's it. Test them tomorrow and adjust from there.